
Resources
- Download : https://opnsense.org/download/
- Setup : https://kb.protectli.com/kb/opnsense-on-proxmox-ve/
Notes
Photos
- OPNsense Features
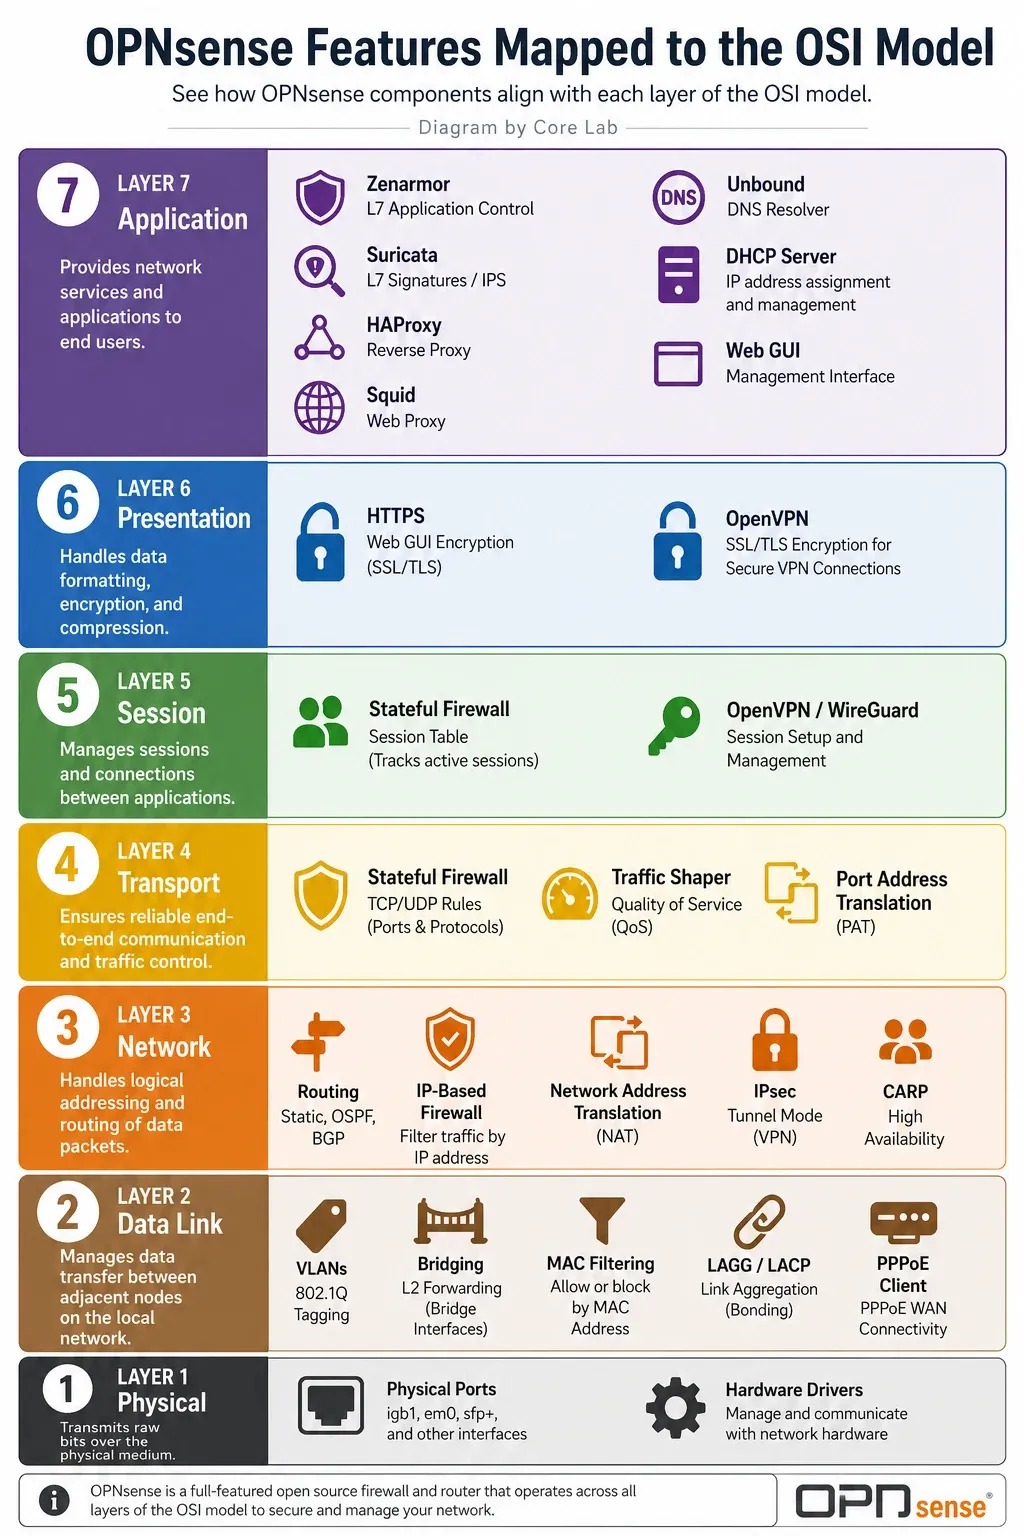
General Infos
- ZFS vs UFS
- UFS - Traditional FreeBSD filesystem with journaling. Simple, very low memory overhead, no copy‑on‑write, no built‑in snapshots or boot environments. Good for extremely resource‑constrained setups.
- ZFS - Copy‑on‑write, built‑in compression, checksums, instant snapshots, and boot environments (huge for safe upgrades). Uses more RAM for ARC (Adaptive Replacement Cache) but runs acceptably with ≥ 1 GB.
- Most Proxmox setups store VM disks on a local ZFS pool (the default
rpool/data). If you then install OPNsense with guest ZFS on that virtual disk, you are putting a copy‑on‑write filesystem on top of another copy‑on‑write filesystem. This causes:- Double caching - Both Proxmox’s host ZFS ARC and the guest’s ZFS ARC try to cache the same data. RAM is wasted, and you may see unexpected memory pressure on the host.
- Write amplification & fragmentation - Every small guest write gets turned into multiple CoW transactions at both layers. Over time, performance degrades noticeably.
- Stability concerns - While it can work, ZFS‑on‑ZFS is officially discouraged by many FreeBSD and Proxmox practitioners. Silent corruption or pool hangs are rare but possible, especially under low memory.
- Practical conclusion : If your Proxmox datastore is ZFS (the most common case), install OPNsense with UFS inside the VM. This avoids the CoW‑on‑CoW stacking entirely, uses less RAM, and is perfectly stable.
- A newly installed firewall always binds the IPv4 address
192.168.1.1to the first network adapter.- OPNsense has an invisible rule baked into its core: If a packet tries to ENTER the firewall from any network, drop it instantly.
- Normal NAT (like your home router) is Many-to-One. All the phones and laptops in your house share a single public IP address.
- BINAT is One-to-One, and it flows perfectly in both directions
OPNsense Kea DHCPv4 Configuration Reference
Category Setting / Field Description Core Settings Subnet Subnet to use, should be large enough to hold the specified pools and reservations. Description You may enter a description here for your reference (not parsed). Pools List of pools, one per line in range or subnet format (e.g., 192.168.0.100 - 192.168.0.200,192.0.2.64/26).Match client-id Kea defaults to client-identifiers. Disabling this changes back to matching on MAC address (recommended for most labs). DHCP Option Data Auto collect option data Automatically updates option data for routers, DNS, and NTP servers when applying settings from the GUI. Static routes Routes the client should install in its cache ( dest-ip1,router-ip1,dest-ip2,router-ip2).Classless static routes Option 121 routes the client should install ( dest_net1 - router_ip1,dest_net2 - router_ip2).Domain name & Search Custom domain name to offer, and a “search list” used to locate non-fully-qualified domain names. Time servers Specifies a list of RFC 868 time servers available to the client. Next server & TFTP Next server IP address, TFTP server address/FQDN, and the specific Boot filename to request. IPv6-only Preferred Number of seconds for which the client should disable DHCPv4 (minimum 300 seconds). DNR option content Discovery of Network-designated Resolvers. Only single backslashes required. Dynamic DNS DNS forward zone DNS zone where DHCP clients should be registered (e.g., home.arpa.).DNS qualifying suffix Suffix appended to create an FQDN if a client only sends a hostname in option 81. DNS server & TSIG Authoritative DNS server receiving updates. Uses TSIG key name, base64 secret, and algorithm (e.g., hmac-sha256).
OPNsense Dnsmasq DNS & DHCP Configuration Reference
Category Setting / Field Description Core Settings Enable Activates the Dnsmasq service. Interface Selects interface IPs to respond to queries (e.g., Lab10,LAN,WAN). If empty, listens on all addresses.Listen port Port for DNS queries. Leave blank for default (Port 53). Setting to 0disables DNS functions.DNSSEC Enables DNS Security Extensions validation. No hosts lookup Prevents Dnsmasq from reading hostnames out of the local /etc/hostsfile.DNS Forwarding Query DNS servers sequentially Queries upstream system DNS servers one by one in order instead of querying them all in parallel. Require domain Blocks forwarding of plain names (no dots/domain parts) to upstream servers. Returns “not found” if unknown locally. Do not forward system DNS Disables forwarding to main system nameservers. Recommended when Unbound forwards local queries here. Do not forward private lookups Blocks reverse DNS lookups (PTR) for RFC 1918 private IP addresses from hitting upstream servers. DHCP Engine DHCP FQDN If enabled, registers fully qualified names (e.g., host.lan.internal). If disabled, registers unqualified names (host).DHCP default domain Specifies default domain when DHCP FQDN is enabled. Leave empty to inherit the system domain. DHCP local domain Marks DHCP domains as strictly local; makes this server authoritative and blocks upstream forwarding for them. DHCP authoritative Check this if Dnsmasq is the only DHCP server on the subnet. Speeds up client recovery for unknown leases. DHCP reply delay Delays dynamic lease replies by specified seconds. Useful for tuning split/secondary DHCP failover setups. DHCP register firewall rules Automatically opens firewall rules to allow DHCP traffic on all explicitly selected interfaces. Router advertisements Globally enables IPv6 Router Advertisements (RA) for configured DHCPv6 ranges. Disable HA sync Prevents these DHCP general configurations from syncing to a High Availability secondary firewall peer. Lease Tracking Register ISC DHCP4 leases Automatically registers hostnames from dynamic DHCP leases into DNS for local resolution. DHCP domain override Forces a specific domain name for all registered DHCP hostnames instead of the default system domain. Register DHCP static mappings Automatically inserts manual DHCP static reservations into the DNS zone file for local name resolution. Prefer DHCP Forces reverse DNS (PTR) lookups to prioritize dynamic DHCP mappings over the manual static lists below them.
Firewall Tips & Tricks
1. Interface Logic (The Airport Analogy)
- Inbound Filtering: OPNsense only checks packets as they enter an interface door from the outside network.
- The Golden Rule: Always place your firewall rules on the interface where the traffic originates. (e.g., If Metasploitable in the DMZ attacks the AD, the rule goes on the DMZ interface).
- Default Deny: If an interface doesn’t have an explicit “Pass” rule, OPNsense silently murders the packet.
- First Match Wins.
2. Subnet Masks & The
/32Trap
- Never use a
/32subnet mask for a gateway interface. It tells the firewall it is the only IP allowed in the network, instantly blocking all other machines. Always use/24(256 available IPs).- The Zombie Network: If a
/32interface is working temporarily, it is surviving purely on cached MAC addresses. The moment the ARP cache clears or the router reboots, the network will instantly die.3. Rule Order & Egress Filtering (Zero-Trust)
- OPNsense reads firewall rules from Top to Bottom (First Match Wins).
- How to build a Red-Team-proof Egress Filter (Outbound blocking):
PASS: Surgical Exceptions (e.g., Allow AD to reply to10.10.10.10ONLY).BLOCK: Internal Networks (Block AD from reaching DMZ/Kali. This instantly kills unauthorized reverse shells).PASS: Internet/Any (Allow AD to reachanyfor Windows Updates/web).4. Routed vs. Transparent Firewalls
- Routed (Layer 3): What we built. Acts as a border checkpoint between different subnets (
10.10.10.xinto10.10.20.x). Computers must use it as a Default Gateway. Visible to Nmap scans.- Transparent (Layer 2): An invisible “bump in the wire.” Sits entirely inside a single subnet. Requires no gateway IP, no routing changes, cannot be pinged, and is completely invisible to Nmap.
Transparent Firewall (Proxmox / OPNsense)
The Goal: Inspect and filter Lateral Movement traffic within a single subnet (
10.10.20.x) without changing client IP addresses or routing tables.** Phase 1: Proxmox Virtual Switching (Layer 2 Separation)**
- Create Client Switch: Go to Node > Network > Create > Linux Bridge (
vmbr3) and another one (vmbr2). Leave IP completely blank.- Isolate Clients: Move the Windows Workstation to
vmbr3. Leave the Domain Controller onvmbr2.- Connect OPNsense: Add a new Network Device to the OPNsense VM pointing to
vmbr3. Reboot OPNsense.** Phase 2: OPNsense Interface & Bridge Setup**
- Assign New Port: Go to Interfaces > Assignments. Add the new port (
AD_Clients). Set IPv4 Type toNone.- Build the Bridge: Go to Interfaces > Devices > Bridge. Add a bridge selecting both ports.
- Assign the Bridge: Go to Interfaces > Assignments. Add
bridge0as a new interface (AD_Bridge).- Set Gateway: Edit
AD_Bridge, set IPv4 Type toStatic IPv4, and assign the gateway IP:10.10.20.1/24.** Phase 3: System Tunables (Flipping the Scanner)**
- Go to System > Settings > Tunables.
net.link.bridge.pfil_member=0(Disable physical port filtering)net.link.bridge.pfil_bridge=1(Enable invisible bridge filtering)** Phase 4: Verification & Testing**
- Test 1 (The Stealth Check): From the Workstation, run
tracert 10.10.20.10(DC). It should be exactly 1 hop. OPNsense remains invisible.- Test 2 (The Filter Check): In OPNsense, add a temporary BLOCK ALL ICMP rule to the top of the
AD_Bridgerules. Ping the DC from the Workstation. The ping must fail, and logs will show in OPNsense Live View. (Delete rule after testing).- Test 3 (The ARP Check): With the block rule removed, clear the Workstation ARP cache (
arp -d *), ping the DC, and runarp -a. The MAC address will populate because non-IP traffic (ARP) safely bypasses the firewall by default.
Master Blueprint: OPNsense Red Team Lab (Transparent Firewall & NAT)
The Architecture:
- WAN (The Internet):
192.168.1.x(Physical home network / Attacker origin)- LAN (The Hacker Zone):
192.168.99.x(Kali Linux DMZ)- DMZ (The Target Zone):
10.4.1.x(Metasploitable/Vulnerable Servers)- AD_Bridge (The Stealth Zone):
10.10.20.x(Windows AD & Workstations)
1. The Transparent Firewall (Layer 2 Stealth)
Goal: Inspect traffic between machines on the same subnet without changing IPs. The Setup:
- In Proxmox, split the network into two blank bridges:
vmbr2(DC) &vmbr3(Clients).- In OPNsense, set both interface IPv4 types to None.
- Create
bridge0tying both ports together. Assign it asAD_Bridge(10.10.20.1/24).- Go to System > Settings > Tunables:
net.link.bridge.pfil_member=0(Disable port filtering)net.link.bridge.pfil_bridge=1(Enable invisible bridge filtering)
2. Egress Filtering (Rule Order is Absolute)
Goal: Allow AD to reach the internet, but trap them from attacking Kali or the DMZ. The Rules (Firewall > Rules > AD_Bridge): Read from top to bottom. First match wins.
- PASS: Source
AD_Bridge net➔ DestAD_Bridge net(Allows local DHCP/DNS/Pings)- BLOCK: Source
AD_Bridge net➔ DestPrivate_IPs Alias(Vaporizes lateral movement to 192.168.x.x / 10.x.x.x)- PASS: Source
AD_Bridge net➔ Destany(The Internet Door - only public IPs survive to hit this rule)
3. NAT Attack Vectors (Translation)
Vector A: Outbound NAT (The Egress Pivot) Masks internal IPs so they can browse the internet.
- Go to Firewall > NAT > Outbound. Set to Hybrid.
- Rule: Interface
WAN, Source10.10.20.0/24, TranslationInterface Address.Vector B: Port Forwarding (The External Breach) Punches a hole in the WAN to expose an internal DMZ server.
- Go to Firewall > NAT > Port Forward.
- Rule: Interface
WAN, Dest Port80, Redirect Target10.4.1.7, Redirect Port80.Vector C: 1:1 NAT (BINAT) Maps a dedicated Public IP entirely to one internal server.
- Add an IP Alias on WAN (e.g.,
192.168.1.211/32).- Go to Firewall > NAT > 1:1. Map External
192.168.1.211to Internal10.4.1.7.
4. Troubleshooting: The Gaslighting Router
If OPNsense refuses to ping
8.8.8.8or returns “Destination Host Unreachable”:
- The WAN Trap: Go to Interfaces > WAN. Scroll to the bottom and UNCHECK
Block private networksandBlock bogon networks. (Crucial when WAN is a home router).- The Gateway Loop: Go to Interfaces > AD_Bridge. Ensure the Upstream Gateway is set to Auto-detect or None, NOT the WAN gateway.
- The DNS Trap: If
8.8.8.8replies butgoogle.comfails, your internet works but DNS is dead. Update your DHCP server to hand out8.8.8.8to clients.- Live View: Check Firewall > Log Files > Live View. Red icon = A rule killed it. Green icon = Routing/NAT is broken.
Egress Routing
The Architecture:
- AD_Servers (Domain Controller):
vmbr2(Proxmox Switch)- AD_Clients (Win10 Workstation):
vmbr3(Proxmox Switch)- AD_Bridge:
10.10.20.1/24(The Invisible OPNsense Wire)
1. The Proxmox & Interface Setup (The Stealth Bridge)
Goal: Intercept traffic natively on the same subnet.
- Split the AD network physically in Proxmox: DC on
vmbr2, Workstation onvmbr3. (Leave IPv4 blank on the Proxmox host for both).- In OPNsense, assign
vmbr2asAD_Serversandvmbr3asAD_Clients. Set IPv4 to None for both.- Go to Interfaces ➔ Other Types ➔ Bridge and stitch them together into
bridge0.- Assign
bridge0asAD_Bridgeand give it the gateway IP:10.10.20.1/24.- Tunables (System ➔ Settings): > - Set
net.link.bridge.pfil_member=0(Stops filtering on physical ports)
- Set
net.link.bridge.pfil_bridge=1(Forces filtering onto the invisible bridge)
2. The Cage (RFC 1918 Alias)
Goal: Create a single object representing all internal lab networks.
- Go to Firewall ➔ Aliases.
- Create
Private_IPs(Type: Network(s)).- Add:
10.0.0.0/8,172.16.0.0/12,192.168.0.0/16.
3. The Firewall Rules (First Match Wins)
Goal: Enforce Least Privilege. Allow AD functions, allow Metasploitable targeting, block lateral lab movement, allow internet. Go to Firewall ➔ Rules ➔ AD_Bridge. Direction must be In for all.
- PASS: Source
AD_Bridge net➔ DestAD_Bridge net(AD talks to AD seamlessly)- PASS: Source
AD_Bridge net➔ Dest10.4.1.7(The Pinhole: AD can strictly attack Metasploitable)- BLOCK: Source
AD_Bridge net➔ DestPrivate_IPs Alias(The Wall: Vaporizes rogue lateral movement to Kali/WAN)- PASS: Source
AD_Bridge net➔ Destany(The Door: Lets surviving traffic out to the true Internet)
4. Outbound NAT (The Internet Disguise)
Goal: Mask the
10.10.20.xtraffic so the external physical router can route it.
- Go to Firewall ➔ NAT ➔ Outbound. Set to Hybrid and save.
- Add Manual Rule:
- Interface:
WAN- Source:
10.10.20.0/24(The whole AD subnet)- Translation:
Interface Address
LAN to DMZ 1:1 NAT (IP Hologram)
The Architecture:
- Kali Linux (Hacker Machine): Lives on LAN (
192.168.99.x)- Metasploitable (Target Machine): Lives on DMZ (
10.4.1.7)- The Hologram IP:
192.168.99.200(Virtual IP on LAN)
1. The Virtual IP (Proxy ARP)
Goal: Force OPNsense to listen for and aggressively answer ARP requests on the LAN for the
.200IP address.
- Go to Interfaces ➔ Virtual IPs ➔ Settings.
- Click + Add and configure:
- Mode:
Proxy ARP(Essential for local subnet NAT broadcasting)- Interface:
LAN- Address:
192.168.99.200 / 32- Description:
Metasbloitable LAN Hologram- Click Save and Apply Changes.
2. The One-to-One NAT (The Translation)
Goal: Map the local Virtual IP directly to the physical host hidden inside the DMZ. 4. Go to Firewall ➔ NAT ➔ One-to-One. 5. Click + Add and configure:
- Interface:
LAN- Type:
BINAT- External network:
Single host or Network➔192.168.99.200 / 32- Source / Internal IP:
Single host or Network➔10.4.1.7 / 32- Destination:
any- Description:
1:1 NAT: VIP to Metasploitable
- Click Save and Apply Changes.
3. The Pinhole Rule Order
Goal: Ensure the firewall allows the traffic to pass. (NAT happens before firewall processing; the firewall evaluates the packet after it has been translated to the
10.4.1.7address). Go to Firewall ➔ Rules ➔ LAN. 7. PASS: DirectionIn, SourceLAN net, Dest10.4.1.7(The Pinhole rule allowing the attack traffic) 8. BLOCK: DirectionIn, SourceLAN net, DestPrivate_IPs Alias(Optional: If enforcing isolation from other lab segments)
4. The Verification Chain
From the Kali Linux Terminal (
192.168.99.x): 9. Trigger a packet:ping -c 3 192.168.99.20010. Check the local cache:arp -a
- Verification: The IP
192.168.99.200must show a valid MAC address belonging to the OPNsense interface instead of saying<incomplete>.
Granting Isolated SIEM (10.10.30.0/24) Internet Access
To allow your isolated SIEM network to reach the internet without exposing it to inbound threats, you must configure OPNsense to route the traffic and tell the Ubuntu VM how to find the exit.
Step 1: OPNsense Firewall Rule (Allow Outbound) By default, OPNsense blocks everything. You must allow the SIEM interface to send traffic out.
- Go to Firewall → Rules → SIEM.
- Click + to add a new rule:
- Action: Pass
- Interface: SIEM
- Direction: In
- Protocol: Any
- Source: SIEM net (or
10.10.30.0/24)- Destination: Any
- Save and Apply Changes.
Step 2: OPNsense Outbound NAT (Translation) OPNsense must translate the private
10.10.30.xIP to your home network’s IP so the internet knows where to send the replies. 4. Go to Firewall → NAT → Outbound. 5. If the mode at the top is Automatic, you are done. Move to Step 3. 6. If the mode is Manual/Hybrid, add a new rule at the bottom:
- Interface: WAN
- Source address:
10.10.30.0/24- Translation / target: Interface address
- Save and Apply Changes.